Sunday, February 17, 2013

Wherein I get fired and drown myself in sewing to stave off depression

Yeah, well, things happen and really what can you do about it.  In my case, SEW!  You see, I got the flu pretty bad I guess a little too close after having gotten ANOTHER illness just before that.  I live part time with four children ranging in age from Elementary to High School...you can imagine the pathogens brought back from that environment.  So instead of wallowing in my self loathing and pity, I spend a lot of time hacking through my fabric stash to make up the gowns that the fabric was bought for.

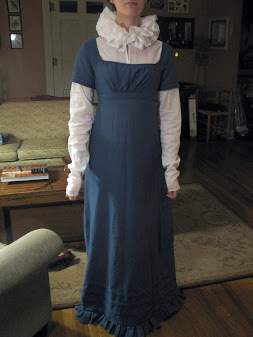
Anyhow, less about that, bring on the projects!  The first thing I made was a short sleeved day gown made out of a dark teal cotton gauze I got in Los Angeles when I was there for my television debut on Judge Judy.  No I am not kidding.

I did not really document this garment so here are some finished photos.


This was my first time putting tucks into a regency dress.  It was a little tricky, but it did look good, I think.  The ruffle...eh..I could take it or leave it.  I may take it off or at least shorten it it makes the dress too long.  I wear a long sleeved giant ruffle chemisette underneath it.


After that I started on, and completed, two other gowns - A ball gown worn at the Locust Grove historical ball that I also did not document well but it ended up looking very nice.  There are almost 200 glass pearls sewing all over it.  It got finished, then went through a couple of alterations that made it look much better. Here are some shots of it before the alterations.
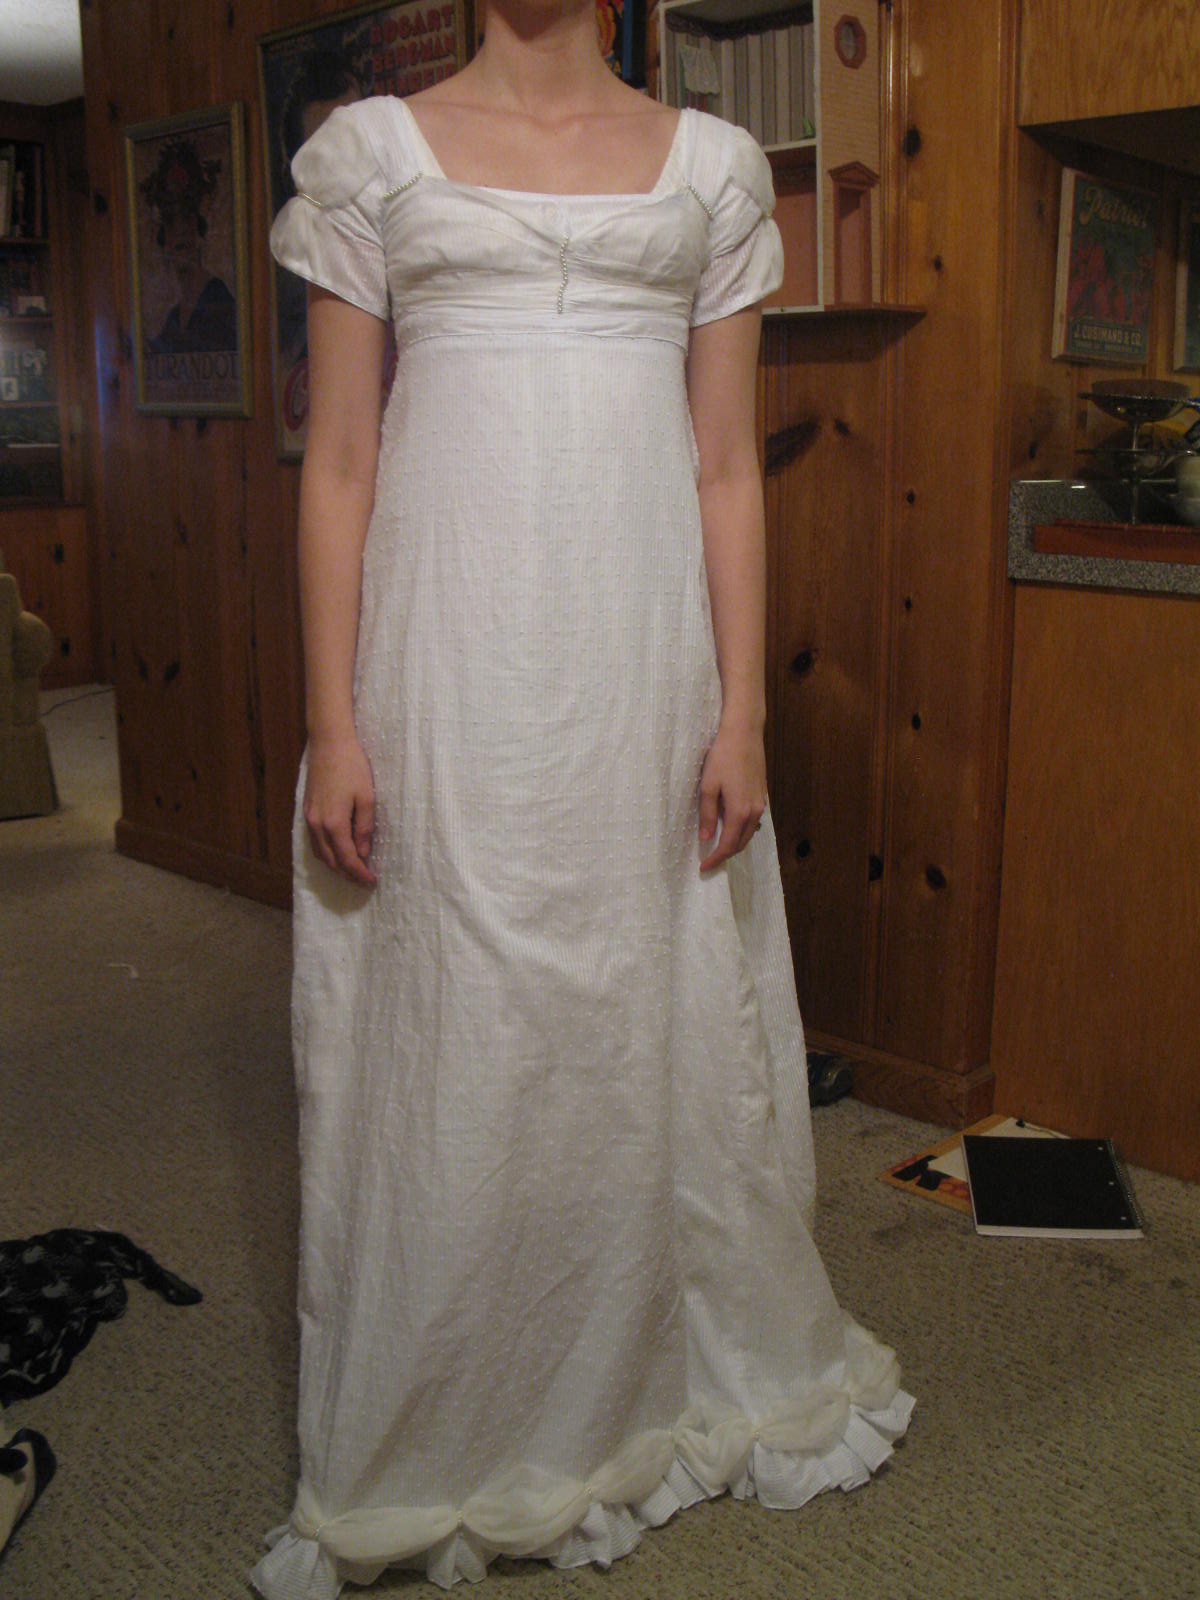


I learned that working with silk gauze was one the most aggravating things I have ever done in my life. I wanted to bash my face on the desk more than once. So what do I do? Decide that I want to put it also on my wedding reception gown on top of China Silk. Yep.  Surprisingly the hem treatment, shown above, was really the most pleasant thing to do.  At the join of each puff there are about 6 pearls sewn down.  I decided to go rather froofy with this number.  For both of these garments I used the same bodice pattern that I draped.  It gave me some fits and needs some great tweaks...or to just scrap the whole thing. Below are the pictures after I did alterations to the bodice - the hem I left alone.


The fabric came from Berkeley when I was back in California for the Dickens Fair, and I bought it at Stonemountain and Daughter with Chrissy.  It combined two of my favorite things - Dots AND stripes! It was a dream to work with..but a bit prone to static.

I also made a new pair of stays, which I desperately needed. I have zero images of these currently but will take and post later.

I had paused a striped gown in the middle to finish the ball gown in time for the event, and has lots of documentation and things to say about it so I will post it at a later date.

Obviously I had given up on the bonnet because I lost all of my images; so don't judge me.

Also I will just say ten yards of white wool soutache braid (actually twenty at this point) and mustard wool crepe.  STAY TUNED KIDS.

Thursday, December 20, 2012

The Saga of 1840's Part Two: Outer Garments


I felt incredibly accomplished when finally I finished all of my underthings – It really was something I had never attempted before, so I counted myself proud.

I think they say, though, pride cometh before the fall..or some such nonsense, so with great gusto and excitement I plowed into getting the bodice and bonnet tackled.  The skirt really wasn’t an issue – a big rectangle pleated into a waistband which I had the foresight after many bad experiences to make quite wide and faced with some extra buckram.  That was done, aside from hemming, in a day.  I planned to wait to hem it until I had arrived in California, to throw myself on the mercy of Chrissy or Curtis, her boyfriend, to hem it for me when it was ON me, petticoats included.  

As I knew I could not drape an 1840’s coat bodice to save my life I needed to decide on a pattern and with great haste – I had no way of ordering anything online.  I perused Simplicity’s catalogue and decided finally on this gem. 


There was no description of the front of the bodice on the fashion plate so I felt myself at full liberty to do just what I pleased in that corner.  I had many inspiration images, but the one I found the most delightful and really to my simplistic, masculine driven military inspired tasted of the Regency was this beautiful painting in which I could zoom super close in.  I love you, Met Museum.


Aside from the lovely hint of military frogging or buttons on the side of the bodice terminating at the armsceye, the lovely slender plain sleeve and white cuff made my mouth water in delight.  Yes, that is a thing.  I made up my mind finally on that decision when I saw my boss wearing a sweet black sweater with white cuff and collar, and when I told her that her particularly favorite garment inspired my 1840’s bodice she was giddy.  

I loved the peplum on the fashion plate I used as inspiration, and had no fear altering the original pattern to add it in – my spencer pattern for 1812 has no peplum and I am frequently adding one in to hide the distance between my spencer and waistband of gown.  

Everything seemed to go well – It took me maybe three mock-ups and I felt like I had finally gotten it PERFECT. 

Once again I cannot get them to be vertical no matter what I do. IRRITATION.


In the end I shortened the peplum just a bit more and seemed satisfied.  But something was…Wrong.  I don’t know WHY it is, but when I cut and began to assemble the final garment everything seemed so much BIGGER! I was furious and panicky – my time was running very low. I said to myself “Oh hell, I will just take it in here, here, and here.”  Don’t do that, people.  Just don’t.  It RUINED my garment.  I must have assumed that after moving to the south and gaining some weight I changed a WHOLE GARMENT SIZE up; which was not at all the case.  Ooops. I had no more fabric in which to make an entire other bodice with the peplum included, so in a fit of rage, panic, and heartbreak, I had to forgo my favorite part of the garment and stick with the pattern entirely with a point in the back.  It came out right well, I suppose, so no harm no foul. I also decided after some deliberation to make it close edge to edge with hooks and eyes since my buttonholer was broken.


At least I can say that making a new, curved, two part sleeve pattern from a straight one piece sleeve pattern went relatively painlessly.  Thanks to my lovely friend Lauren at Am. Duch. I did it with only two mock ups – the first being a little wonky.  It did some out rather tight and I had trouble bending my arms up all the way whilst in costume but I think I can chalk that up to the velvet being thick.  I loved the look of how tight they were, though.  

It is very hard to tie ones own boot while corseted. Taken by the lovely Lauren

I accessorized with a muff, cur collar, and plaid reticule and matching light blue gloves found at an antique mall. Photo Taken  by Lauren.

Not to mention my ever present and beloved miniature of my Doctor. Photo taken by Lauren.


This guy was RAD.   He let me hold it, hehe.  Also I spent a lot of the weekend looking like I had a robot canon hand.


Aside from how absurd this picture is it shows that under the bonnet ties and insanity I opted for a traveling look ala Young Victoria with the jacket and cravat.  I thought it looked sharp as hell. Also I piped my  neck edge and bottom edge and armsceyes, because I could.  I also made my own tassels..I'll do a tutorial on that some other time.

Tune in next time, for the raucous tale of my first buckram bonnet EVER! 

Wednesday, December 19, 2012

The Saga of 1840's, Part One: Underoos

Yes, yes. I understand - I have been so terrible about updating that it is downright laughable.  You can forgive me right?  Well you will have to once I post amusing pictures. 

Lately there has been too much of a dry spell in regards to sewing to really update..I made the Doctor a new Regency shirt..that is about it, I suppose.  I have a pile of UFO's and bursts of inspiration but very little motivation, unfortunately.

I did however create an outfit for the San Francisco Dickens Christmas Fair which unfortunately I did not document well...But I can talk about it to the best of my abilities.

My trip to Dickens was a surprise for the amazing Christina at The Laced Angel from her sweet boyfriend who thought she might like my harassing presence as a gift for their anniversary.  I think he was right, anyhow.  I knew since August that I would need something so I started the fun of researching.  All my images can be seen here.  I decided almost immediately on this fashion plate:

I chose the garment on the far left.

I knew I already had some lighter weight cotton velvet in a dark blue hanging around in the form of a pelisse which I unfortunately never really enjoyed wearing - it was always too small and uncomfortable.  There was plenty of yardage there for the little coat. Before I could get any of that out of the way, I needed underwear.

First things I made were my chemise and drawers - each going together in a day from beginning to end, flat felled seams included.  They were a really good start because they were easy and gave me confidence.  I should learn that easy beginnings never signify easing endings.  Christina showed me a sweet pair of pin-tucked drawers that were originals she bought at an antique store that I fell in love with so they served as an inspiration for my drawers.  I edged and detailed my underthings in a simple cotton scalloped lace.

My first experiment with tucks, a pen, and a ruler.

Once they started going it was a good rhythm.

As an after thought I decided to put some lace under the tucks instead of the flounce you see on a lot of Drawers.

  
The finished product!


The lace at the edge of my Chemise cuff.


Both of them in action the Sunday before Dickens.  They are not exactly FLATTERING but very comfortable.


After I got all of that done, I had to knuckle down and start on the corded petticoat which I expected to be much worse than it really was.  It was absolutely time consuming, don't get me wrong, but I was happy I could figure it out MOSTLY unaided.  I used a very wide cotton macrame cord because A) I was impatient and wanted to do as little work to get as much effect as I could, and B) it was available the cheapest for the most amount. I spaced my cords about an inch, maybe a little less, apart and did my first grouping of 8, a second grouping four inches up of 6, a third grouping four inches up of 4, then a fourth and fifth grouping of two.  I was worried I would not have enough of a bell when finished but after I starched it I was completely SHOCKED to see how puffy it was! I was delighted! I pranced around the house in it to see how, if at all, it would get tangled in my legs.  It did not ONCE. I was gleeful, nothing irritates me more than having a multitude of petticoats trapping my  legs when I walk.

This counts as prancing.


I don't know why the hell this picture is sideways, It isn't on my desktop but here is.  Stupid technology.


After that was all finished I made a secondary petticoat to add EVEN MORE FLOOF because thats what I do.  I wanted a bell that seemed as if I was wearing a hoop, yet still being period correct. I had just enough muslin after buying the bolt to make a two teired petticoat to wear over the corded one.  I've made them before, so two did not seem like any difficulty, and it wasn't.  It went together rather quickly as well. I used the tried-and-true method of cord gathering the teirs and I am happy I did - each teir was roughly 7 yards.  I did not starch it until I was in California and WOW it was incredible.  I used StaFlo which is a dippable starch you can get at walmart, and it works VERY well! All you 'Bethan nobs with ruffs, look into it.

Pre starched for everything.  Still has some floof, though!

Sewing Ruffles on is so tedious.

After I assembled all of these things, a bum pad, and the chemisette I was going to wear under my jacket, it was time to start on the actual clothing AND the bonnet.  Stay tuned for more exciting adventures in the 1840s! I promise I wont wait months to post again. Really, I wont.

Tuesday, August 21, 2012

Sewing is hard, and stuff likes to remind me of that.

Lets all just come out and say it, and not beat around the bush.  I am a terrible blogger.  I accept this completely.  I will never post step by step day by day sewing experiences, because I sew so quickly and things change so fast the likelihood of me stopping to document and write about it is low - deadlines and all that.

That being said, lets talk about the two latest projects I have been mentioning; the white swiss dot gown and the Royal Navy Frock coat.

I literally JUST finished the frock coat last night, which was an amazing feeling, but the swiss dot gown was done back at the beginning of July. As last I recall posting about it, I said it was going right well.  I was right wrong. So so wrong. So wrong it was laughable.

I forget that things that fit on Abigail will NOT fit on me. 
See how nicely it all matches up on the sides? How it all fits together and is flush? Yeah, so when I finally put it on my body, I have no idea how but SOMEHOW it was off by almost an inch on each side.  There was no fixing that. 

So I did what I always do - completely took it apart and went to my old stand-by that I was comfortable with, the same style of bodice that is on the revamped version of Old Faithful, which I knew would fit, was comfortable, and more importantly would go together quickly.  It ended up probably being the best idea anyhow, and still looked good.


I at least enjoyed doing the sleeves very much, they were fun and it was fun to do something so creative and out of the ordinary.  They were inspired by this frock-


I started by cutting out a very short cap sleeve off of my basic good-for-everything sleeve pattern and then hand rolling ruffles.  A note about hand rolling hems - I hand rolled the hems on the ruffles of my old faithful revamp and after that decided 'who gives a flying..no one is spending that much time at my feet.'  So for anything in the future, the items at eye level can be done by hand for the nay sayers, anything else I have a 2mm hem foot and I used it.  900 inches of ruffles was not being done by hand. 

So after rolling four hems, I started to assemble the multiple pieces of sleeve, the top part, and then the band that made the second layer of sleeve.


Attaching the ruffle onto the second layer

Showing the two layers of over sleeve.
Basting the finished over cap sleeve onto the full length sleeve.

As this was an after thought, the ruffled cap sleeve was sewn onto a full sleeve instead of a detachable under long sleeve.  It helped to add some body to the sheer fabric, so it all worked out well.  The wrist was a very similar series of steps - adding a ruffle to the end of the sleeve, then adding a band with a ruffle attached to make a second layer.

After the bodice was FINALLY finished, and looking right well, it was onto the skirt, which was a daunting process.  First I had to hem all 900 inches of the ruffles, then hand gather them (as the machine ruffler foot was being a pain in my ass).  Luckily gathering the ruffle was not bad, I could sit in front of the t.v. and ruffle them up! Then I had to attach them..which I would be doing my machine.  Having made a couple of tiered victorian skirts, I had learned a few tricks.  One of them being to pin a great long ruffle onto a base of fabric requires a big space, usually the floor.  We only have hardwood floors.  I had a solution!

Yeaaah, I'm so awesome, I wear knee pads when I sew. And pin.  And it worked to accomplish this -

Three times. I feel like I need to take the second ruffle and set it back from the first a little more, this picture shoes me working in the third ruffle, the first two are almost right on top of each other.  It looks very well when its on, though so perhaps I will leave it.

Finally this was done and I was able to attach it together and it was on its way to being done for Canada, which was its debut, and it was received very well there and at Jane Austen festival.

Now for the obligatory mass showing off of pictures of it in action!

The red spencer looked very fetching with it.

Waiting for the ships to come in in Canada


At Jane Austen festival

A good view of the finished bodice and sleeves on.


Wednesday, June 13, 2012

Royal Navy Shinangians. Are you jealous? You should be.

My helper kitty, Arthur.
The past few weeks have been a series of fortunate and unfortunate days of sewing.  At times this Royal Navy Surgeons uniform has sent me into a fit of tears, and other times, I high five myself when I figure out something that I suspected I would never be able to do.  Yes, I high five myself.

The waistcoat was probably the easiest thing to do, I love waistcoats.  The breeches were a little more difficult to accomplish, but somehow I muddled through them.  I still will never make breeches again.

Then came the frock coat, which I assumed would be the easiest thing to do, since it was similar to waistcoats and you know, I made spencers and junk, and helped Mr. Ramsey with a couple of his.

What the hell am I doing here.
Oh foolish, simple me.  I was so so wrong.  Not only had I never made one from scratch, It was not a civilian style which I was previously used to, and I had to heavily alter the pattern as it was an American militia jacket.  The mock up seemed to go right well, and I was confident I would be able to transfer it with little difficulty.

When will I ever learn that things which appear to be simple will most certainly NOT BE especially if I am creating something I have never created before.

It was too big then after it being taken it, it was too small. I have had to re cut out and sew two pieces, I have had to take it apart and resew it back together about twenty times (this is NOT hyperbole. Ok maybe it is a bit, but not by much), and vow to never work on it again before I have gotten to a suitable, satisfactory point with it.

The good Doctor working on his collar embroidery.
The Doctor, too, has had his fair share of fits and frustrations with it - he has bravely taken the charge to embroidering the twist on the neck seen in the original uniform, found at the Maritime Museum in England.  Halfway through one side, there was some difficulty between various RN fans in whether or not the metallic embroidery was gold or silver.  So until we hear back from the Maritime Museum with a definitive answer, that is on hold.  He was doing so well, too..

He has also been working very diligently on a Chapeau Bras, starting with some intense research, black poster-board, tape, and some wrapping paper - called the Chafeaux Bras (yuk yuk yuk).  Now he is on the Mark Two mock up out of stiffer materials, spray adhesive, and some very impressive brain skills. Its looking very sharp and I am quite impressed and proud.
The poster-board Chafaux bras. Slightly suggestive..

Now, all that is left to do is 28 button holes by hand.  I have less than a month left until this royal navy event in July.  Whilst the dear Doctor has encouraged me that he will be just as happy without the coat, I still would like it to be done for him to show off - if I can. 

Pad stitching on the collar to stiffen it.
I have had to start another project on the side to turn to when the coat was making me frantic - a swiss dotted drop front with three ruffles on the bottom, and its turning out right well if I say so myself! More on that later (since it also made me crazy a bit.)