Friday, August 9, 2013

A sewing round up; or: Where the hell have I been?

I've been here.  I've been here and BUSY! Sewing, always sewing. Sewing and never stopping.  What have I made since the last time I posted?  Well..A lot.  I revamped that ball gown in the last sewing post.  The ten (more like 15) yards of soutache braid I talked about and the wool crepe has turned into a beautiful carriage dress.  I made a delightful spring green ensemble, I finally finished the revamp of the archery dress (we no longer look like kermit the frog), and made a beautiful white spencer to go with it.  I made a square hat, and a shako.  I made a stunning white and yellow swiss dot day gown with ten tucks in the skirt done by hand..and I think that is finally it. 

I realized that I think its time I really start to blog in earnest.  What have I done with my day so far?  Well for about two hours I have sat on my ass in front of the television and watched game shows.  I could have been blogging...at the same time.  Hey, this lady does not like to miss her Price is Right. 

I will now use this time to talk about the carriage dress which is what I mentioned in my last post.

When I realized I was going to Washington in March, I wanted to have a really fantastic and warm outfit to wear whilst there.  I actually ended up making a couple of outfits to wear, because there was going to be a tea and then an outing to Whidby Island, and I couldn't wear the same thing twice.  Duh.  I chose to have to wool outfit for the outing because it is cold in March in Washington.  And there was a ferry ride across the sound.  That mess is cold, I lived on the Pacific ocean for a while, I know the drill.

I had a few carriage dresses or walking costumes as inspiration:


I know I wanted to step up my game and go military for this one more than I have ever done in the past.  So I took my beloved Period Impressions spencer pattern, cut it all out and put it on the form to draw on some ideas for the braid across the front. 


I was on the fence about how to do the pattern across the front, I needed some sort of template because I didn't trust myself to do it without.  It ended up being "well now you are screwed because there is no template just eyeball it."  Which I ended up having to do.  Now for the cuffs and collar I had my wonderful graphic designer fiance help me with the template, and he did an amazing job printing me off something I could use.


You are probably asking yourself..well, that  looks neat but how did you magic it from the paper to the fabric?  Again, the Doctor comes through with an age old before-the-computer-graphic-design-trick.  He is 15 years older than me, don't hate.

Step one, with a typical, number 2 pencil rub it on the BACKSIDE of the paper liberally

Make sure its a decent layer the size of the pattern you want to transfer

Step two, lay the backside of the paper pencil side down on the right side of your fabric.  Proceed to take the same pencil and draw on the lines pressing firmly.

Step three, try not to look at the imperfections and stab your own eyes out, and go for it.

With that done,  it was time to then spend what felt like the rest of my life sewing on yards and yards of worsted wool soutache braid. 


Now there is a trick to working with soutache braid to get it to form these wonderful loops and it is incredibly time consuming. And hard on your hands!  Soutache is formed by two cords with a twill weave of the fiber around it.  You trim off an edge, and take ONE of the cords depending on which way you want your curl to go, and pull that string until it starts to pucker and loop like you see in the above photo.

I spent two weeks of at least 8 hour days sewing on soutache braid.  My hands and eyes were so tired by the end but I was VERY pleased with the result.


What you cant see because it seems I have no in progress work photos of it is the hem has a simple loop pattern along it. That took forever.

Once all the pretty work was done it was down to get to the nitty gritty - the structure that holds the whole thing together and gives it its proper shape and look.  Because the fabric of the garment was a light weight wool crepe, it needed something to help hold it up with all of that trim on it - so I interfaced the fronts with canvas and then pad stitched the living hell out of it.


I probably could have pad stitched it more but it did its duty and looks pretty snazzy too.  I then did the same thing to the collar and included some narrow 1/4" bones to help the collar to really stand and be imposing to show off the trim I worked so hard on.


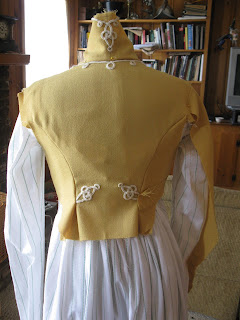
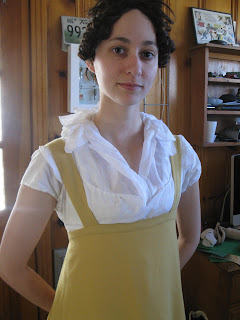
Then when that was finally done and I was on my death bed from how long it took to do all of this nonsense, it was time to assemble.  I chose to do a petticoat and matching spencer instead of a full bodice on the skirt, only because I was lazy and felt like that was A LOT of bulk, and would likely never wear the skirt without the spencer.  In hindsight I may go back and get more fabric to make a dress bodice on the skirt, because it is a fantastic gown to wear in the winter.  So I made a waistband, and two straps set at an angle towards center back to  keep them from falling off of my shoulders.


At long last the gown was done! I needed a hat.  I decided to make a nice imposing shako in a sky blue to match these lovely sky blue/robins egg blue gloves I had, yellow and blue always look wonderful together.  The Doctor is incredibly at putting together patterns for hats for me, he has the brain to wrap around the shapes of millinery which I do not have, it seems..so he knocked me out a paper model and I used it as the pattern! 


Yeah..I also have my spencer on inside out to do the darts.  What up, I'm awesome.


Yeah, I cheated and glued the bias tape onto the frame over the wire.  What.  Don't judge me.  I hate millinery.

At long last it was finally time to throw it all together and go take pictures!


Here you can kind of see the loop pattern on the skirt.


I made the tassels myself out of wool embroidery floss.


I paired it with my vandyked chemisette collar and it looked rather fetching.

I wanted buttons on the outside loops as well but it looked too cluttered.
 Of course in the process of making this what I think my best work yet, I had a little help from my assistant.


He really isn't all that helpful in hindsight.


Thursday, August 1, 2013

A study on Empire coats from 1810-1830, with a note on researching

A note on research:  Whenever someone gives me something that I might think disagrees with everything I feel like I have ever heard on the subject, my first reaction is to dispute it - but I often will stop myself and re-check my resources. This is an instance where I knew what I had learned previously was as accurate as we can be without time machines, and I set out to confirm my thoughts.  This is a subject pertaining to when we begin to see a waist seam on frock coats for men; to make it more plain when were the tails and the body cut and sewn as two separate parts.  All of my experience has told me that this fad did not begin until AT LEAST 1816, which I was wrong on because we do not begin to see it until AT LEAST 1818.

On that note, let me mention some things about thorough research.  As my fiance often says "It is OUR job as historical interpreters/re-enactors to be as historically accurate as we can for the public." That being said, when researching it is very important to exhaust every source you can possibly find.  if you find something fantastic on say, Pinterest or a Google search, it is then your job to cross check your findings with at least three other sources if applicable.  Written descriptions of the period, fashion plates, portraits, and original garments.  When it comes to original garments, ESPECIALLY if they are found in a museum it is important to again cross check those, and take them with a grain of salt.  Use your own knowledge of the period to help you in making decisions; museums though a wonderful source are often notorious for VERY broad or mis-dated items. A garment with anything more than a five year date span  must be looked at with a skeptical eye - though men's fashion is notoriously slow to change in the early 19th century things were, in the grand scheme, rapidly changing.  The styles morphed DRASTICALLY between 1810-1830, just look at the examples shown here.  No one garment can cover that span accurately.

I went to some clothing historians first before I dug a  little deeper to see if it would be worth my trouble.  I consulted with friend and author Martin Lancaster of Napoleon and the Empire of Fashion and Besty Bashore of 19th U.S. Fame as well as a man I consider to be a great brain on the matter Brian Cushing of "Dressing Mr. Darcy" and Notes from the Victorian Man (which is a fantastic source for information, btw).  All of them had coinciding information with mine about that waist seam in coats.  Martin Lancaster had to say "It seems to be connected with the men's corset." as well as "It seems that as the fashion brings the waistline of the front of the jacket down to the level of the hips then you need a seam to handle the change in angle of the hips", which if you observe in portraits during the transitions and some prints, you can see where the desire to change began.

Following are a collection of fashion plates and originals from 1810-1817:


Full Dress Ackermann's Print 1810


Mint Museum ca. 1805-1810
Costume Parisian 1810
MFA Boston 1810-1815


MET Museum 1810
Kerry Taylor Auctions 1810-1815

Costume Parisian 1811


Costume Parisian 1812


Costume Parisian 1812


Costume Parisian 1813

Kyoto Costume Institute 1810-1815

Costume Parisian 1813

Costume Parisian 1814
Costume Parisien 1815

Costume Parisien 1815
Costume Parisien 1816
Costume Parisien 1817


1817 portrait of Nicholas Pierre
All of these portraits, fashion plates, and originals dating between 1810-1817 have no waist seam.  Costume Parisien produced the largest number of male fashion plates of the era, so they have been used for my "fashion plate" criteria.  I have only chosen a couple of examples, but feel free to look through more here. You will see that in all of the men's plates until 1818 there is no waist seam.  Now, before anyone tries to mention how they won't show a waist seam in a fashion plate; please observe these samples between 1818 and 1828:

Costume Parisien 1818

Costume Parisien 1819


Fashions 1819, found from Scene in the Past Flickr

Costume Parisien 1820
Costume Parisien 1828, our gent in the back has a seam.

Here are some extant garments with the waist seam dated no earlier than 1815, which shown by our above images is a stretch already.

Linen Coat, Augusta Auctions 1825-1830

Victoria and Albert Museum 1815-1820
Ebay find, ca. 1820-1825. Let it be known that I take this one with a grain of salt but it follows suit with the shape I am displaying, sort of speak.
With these sources I cannot help but think the "norm" as it would be for our 1810-1830 span would be the coat being cut as one piece prior to 1818 wherein we begin to see the bottom half and top half being treated as two pieces. 


All of this may seem a little strange to some, but it is very important for LIVING HISTORIANS to make absolute sure of what it is they represent, because we are the link between modern day and history for the every-day-run-of-the-mill person who sees us at re-enactments.  To perpetuate false information or haphazardly researched information is a crime to the public who uses us to learn.  Be mindful of what you share, and take a little extra time to think; and to read that one extra publication, and cross check one extra time that museum piece you found.